
Sketch Support #48 | Learn How to Use and Adapt Scrapbook Sketches | Day 3
- Allison
- 19 minutes ago
- 3 min read
Once a month learn how to use scrapbook sketches and adapt them to fit different styles, photo sizes, and themes. Sketches = endless scrapbooking ideas with little effort. Sketches do all the heavy lifting allowing you to have all the fun!
For my third layout I adapt the two-page sketch to work on a one-page layout. This one was especially easy since the left side of the sketch is perfect for a one-page design!
Here is the two-page sketch that I'll be using this week:

You can also grab the Sketch Support #48 Bonus Sketch Examples!

This month it is a 3-page PDF of 22 different sketch options. That makes 23 sketches for this month of Sketch Support. There are options that show how to change up the papers, use more photos, use less photos, there are three one-page options, and then an 8-1/2 x 11" option. The fun part is that you could use each option as a layout on its own, but you could also mix and match different options for endless possibilities!
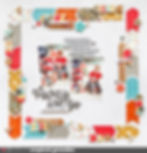
Supplies used - Cardstock: American Crafts; Patterned paper: My Mind's Eye and Bella Blvd.; Acrylic stars: Color Cast Designs; Title words and black stars: Cocoa Vanilla; Phrase stickers: Simple Stories; Embroidery floss: DMC; Computer font: Century Gothic
For my one-page layout I focused in on that left page and the frame design and used that as my starting point. When I picked out my photos, I knew right away that I wanted to use arrows to create the frame. I had originally planned on using one of our newest cut files for the frame...

...but my computer was being crazy slow with a software update and I grew way too impatient. Thankfully there are many ways to create an arrow frame so I knew I could make it work.

Some of those arrow options for the frame that I thought about were
• Use long arrow strips, one for each line of the frame.
• Use a bunch of different arrows pulled from various premade die cut packages or cardstock stickers.
• Trace and stitch the arrows.
And what I settled on...
• Making small arrow strips.

I cut out several 1 x 2" strips out of various patterned papers and then used my hexagon punch to create the notch and arrow point on each end. Then I arranged them in a square around the layout, about 3/4" from the edges.
I wanted to add more detail to the design so I also cut out some arrow strips from a patterned paper and layered them around the frame design. I used foam adhesive for these to add some dimension to the design.

For my finishing touches I added some stars and word/phrase stickers.
Inside the frame I somewhat followed the sketch design by using two photos tilted and overlapped and my title and journaling are in the same arrangement. But, I did go with smaller photo since that's what I had on hand.


That's all for this month of Sketch Support! Next up the video version!
Shop all sketches here: Allison Davis Sketches
Shop all cut files here: SG Cut Files
Want to see more? Find me on...