


Sketch Support #46 | Learn How to Use and Adapt Scrapbook Sketches | Day 2

Once a month learn how to use scrapbook sketches and adapt them to fit different styles, photo sizes, and themes. Sketches = endless scrapbooking ideas with little effort. Sketches do all the heavy lifting allowing you to have all the fun!
I made some big changes with my second layout using this sketch. I was in the mood to go water themed and had the perfect photos I've been waiting to use!
Here is the two-page sketch that I'll be using this week:
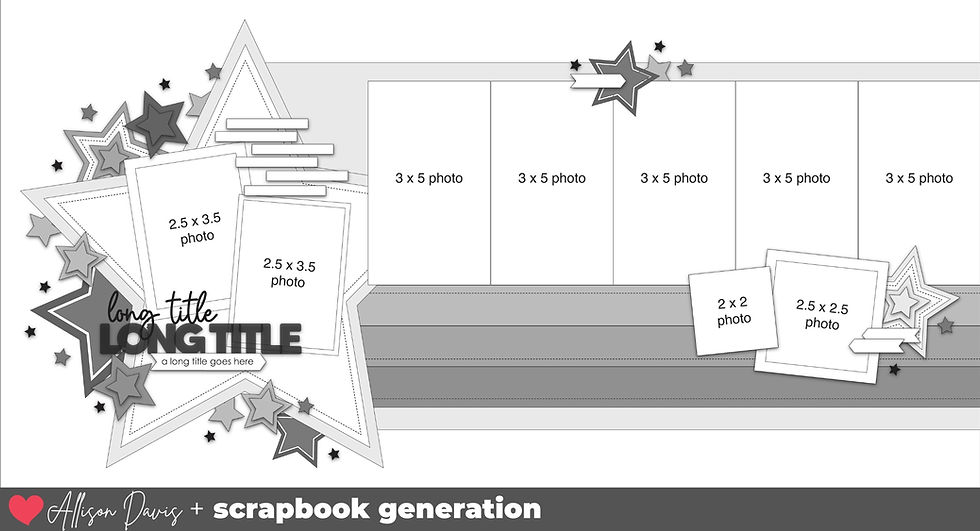
You can also grab the Sketch Support #46 Bonus Sketch Examples!

This month it is a 3-page PDF of 22 different sketch options. That makes 23 sketches for this month of Sketch Support. There are options that show how to change up the papers, use more photos, use less photos, there are three one-page options, and then an 8-1/2 x 11" option. The fun part is that you could use each option as a layout on its own, but you could also mix and match different options for endless possibilities!
I've also designed a cut file that matches the large star with the star cluster on the edges. If you have a die cutting machine, this can make putting this layout together much easier!


Supplies used - Cardstock: Bazzill; Patterned paper: Echo Park and Carta Bella; Foam word and word/phrase stickers: Simple Stories; Alphabet stickers: Elle's Studio; Water droplet cut file: Scrapbook Generation Embroidery floss: DMC; Computer font: Century Gothic
Variation #1 - Flipping the sketch.
The most common reason I flip a sketch is due to the photos and the direction the subject is facing, but that's not really my reasoning for it with this set of photos. They would have worked either way. However, I wanted to showcase the action taking place from start to finish with the finish ending in a big splash. To do that I prefer for the photos to flow in order, from left to right. For this to happen I had to flip the sketch so that the ending photos with the big splash were on the right page.

Variation #2 - Changing the photo sizes + Including more photos
With this set of photos I had used burst mode with my GoPro to take a series of photos of Drew falling backwards into a wave. Burst mode takes rapid fire photos, like 30 in a few seconds, so you end up with photos that show action. I LOVE taking photos like this and creating layouts with them!
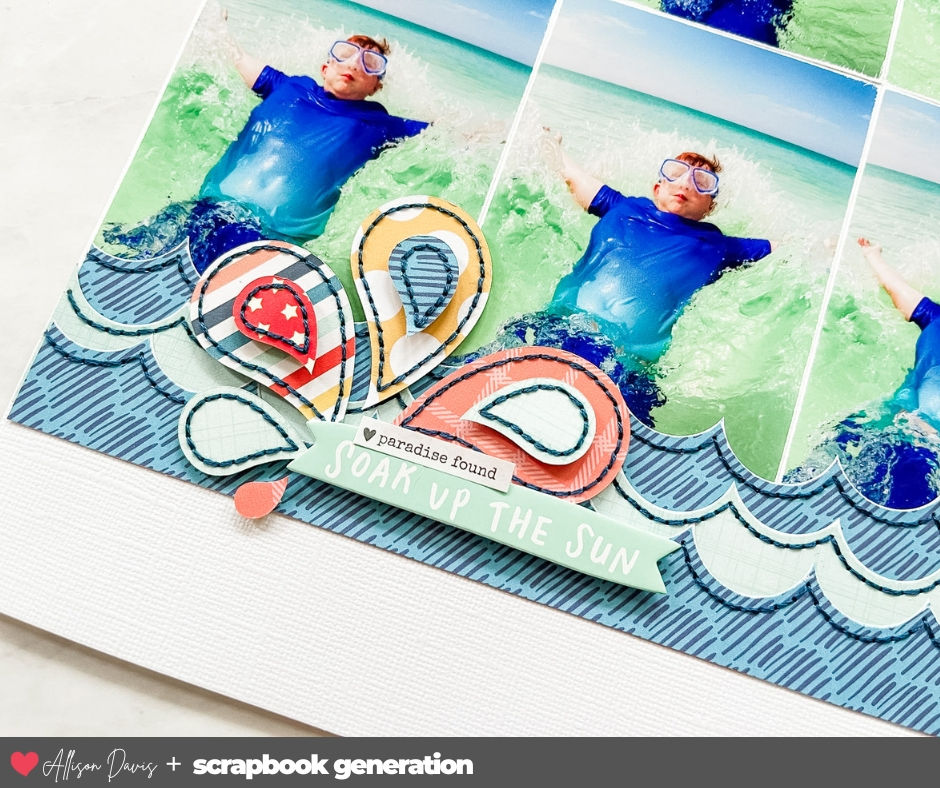
I ended up using 12 photos that show him from start to finish of the fall and arranged 10 of them on the left page. The original sketch design has 3 x 5" photos and I opted to use 3 x 4" photos and double stack them instead. This is 3" taller than what you see on the sketch, but it works, especially after removing the background piece and altering the horizontal strips.

Variation #3 - Removing the background and adapting the horizontal strips.
I removed the background pieces to help make room for the larger photo arrangement. That was an easy fix to include more (or larger) photos!
I also changed up the horizontal strips to go with the theme of my layout. I use three wave strips and overlapped them together. They are right along the bottom edge of the photos, just like the ones on the sketch, but since they are overlapped, they don't take up as much space.

Variation #4 - Use a large themed background and cluster instead of the star.
As I was creating the sketch I kept envisioning a large splash design so of course I had to find some water themed pictures to use! I used my Silhouette and one of my own water droplet cut files to cut out several different sizes out of several different patterned papers.

Then I adhered the larger ones in the middle to create the base of the splash with lots of smaller ones popped up along the edges. The use of high contrast dark blue stitching helped tie it all together and really highlight the splash design.

I also repeated the splashes on the left page to create that visual triangle and help frame all of the photos.
That's all for today! Check back tomorrow for layout #3!
Shop all sketches here: Allison Davis Sketches
Shop all cut files here: SG Cut Files
Want to see more? Find me on...


Comments