
Sketch Support #20 | Learn How to Use and Adapt Scrapbook Sketches | Day 3
- Allison
- Apr 28, 2021
- 3 min read

Once a month learn how to use scrapbook sketches and adapt them to fit different styles, photo sizes, and themes. Sketches = endless scrapbooking ideas with little effort. Sketches do all the heavy lifting allowing you to have all the fun!
You can probably start to see a pattern with my layouts and where most of my customization focuses on with this sketch. Today, I used a large die cut in place of the those banner strips.
Here's the sketch that I have used as the starting point for each layout this week:

You can also grab the Sketch Support #20 Bonus Sketch Examples!

This month it is a 3-page PDF of 23 different sketch options. That makes 24 sketches for this month of Sketch Support. There are options that show how to change up the papers, use more photos, use less photos, use only 4 x 6" photos, there are four two-page options, and then an 8-1/2 x 11" option. The fun part is that you could use each option as a layout on its own, but you could also mix and match different options for endless possibilities!
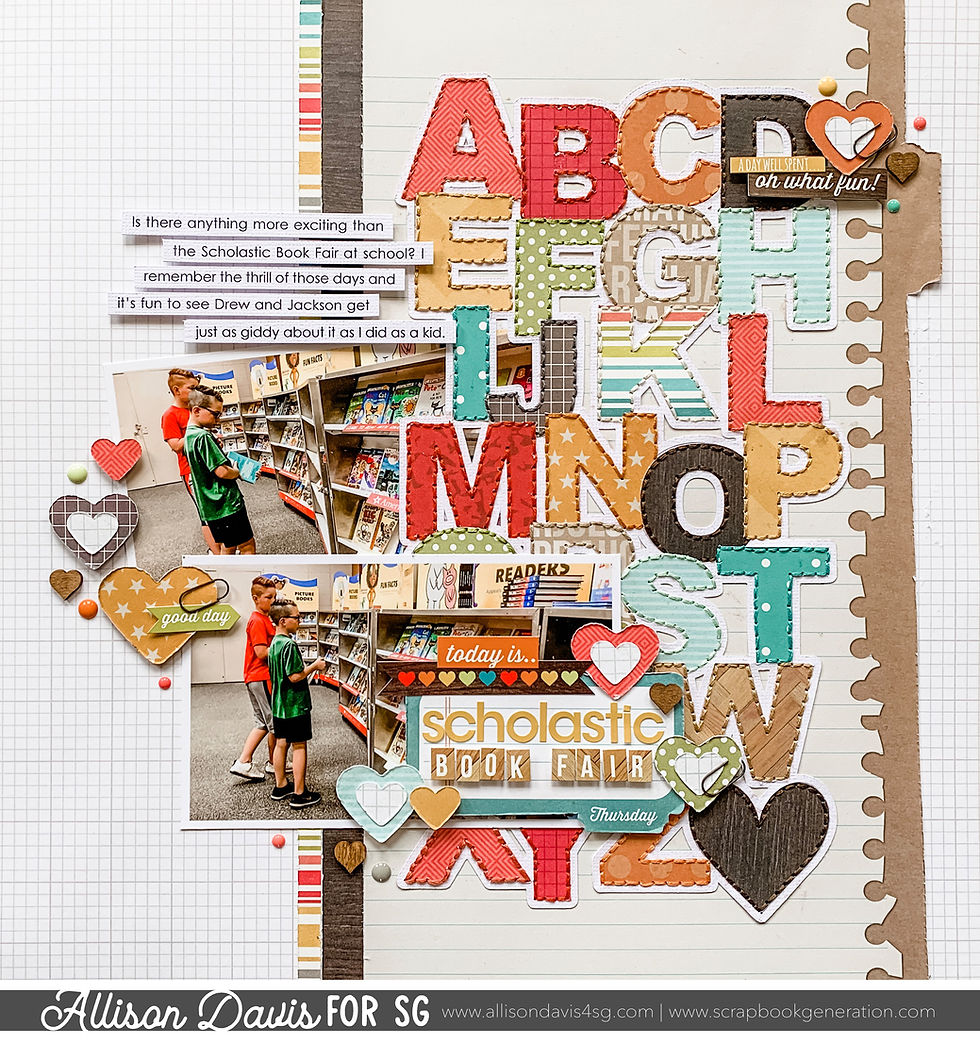
Supplies used - Patterned paper, stickers, and enamel dots: Simple Stories; Paper clips: unknown; Heart punches: Recollections; Wooden hearts: Studio Calico; Embroidery floss: DMC; Computer font for journaling: Century Gothic; Computer font for ABC die cut: Arial Black Regular
Variation #1 - Using a large die cut in place of the horizontal banner strips.
One of the very first ideas I wanted to try with this sketch was using a shape in place of the horizontal banner strips. I thought it would look really cool to have a bunch of rows of stars or hearts or hexagons. After I had selected my photos, I thought the photos of Drew and Jackson at the Scholastic Book Fair would be my opportunity for this idea, but instead of shapes I decided to use the alphabet.
I used Silhouette Studio to arrange the alphabet design I wanted, welded them all together, and then added an offset to create a frame around the letter design. Then I cut it out of white cardstock on my Silhouette along with the individual patterned paper letters. All I had to do was adhere the patterned paper letters on top of the cardstock piece.

To add a little extra detail and texture to the whole design, I added a stitched border around each letter. I used embroidery floss colors that matched the color of the letter.
Variation #2 - Using two larger photos in place of three smaller photos.
This sketch really is an easy one when it comes to using the photos you have. You can use pretty much any photo you want and it would most likely work with this sketch.

I used two 5 x 3" photos. One of them is arranged on top of the alphabet die cut and the other one has part of it behind the alphabet die cut. I didn't want to cover up too much of the die cut piece and with these photos and my kids in the far left of the photo, I figured that I could slightly cover one without losing an important part of the photo.
Variation #3 - Moving elements to better fit.
I moved the journaling above the photos. Because I used horizontal photos and with my kids taking up the far left edges of the photos, it left me without much room for journaling like you see on the sketch. There was plenty of space above the photos so I moved it up there. Since there's nothing else in that area, I didn't have to make any adjustments to make it work.

Variation #4 - Changing elements to better fit the theme.
To match my journaling about loving the Scholastic Book Fair I thought hearts would be a good fit for my embellishments.

I kept them simple since there's already so much going on between the large die cut piece and my photos are a little busy too. I didn't want to overwhelm everything by going too detailed with those embellishments.

That's all for today! Tomorrow is another day and another layout based on this same sketch.
If you enjoy this sketch you might want to check out all of the sketches we have at Scrapbook Generation. There are tons to choose from!
And you won't want to miss the NEW upcoming class! The deadline to join ends soon on May 2!


The company was acquired by link Kering in 2014, and earlier this year it was un-acquired by Kering. Having shrugged off the mantle of link its corporate conglomerate, link it is presenting its new independent face to the world with these rainbow watches.
I strolled through Times Square with one watch on each wrist and then returned link to my own thoughts. Having the watches changed my link entire thinking on the release. I no longer had to wonder what it would be like to wear one link – I was spending a week with two.