
Sketch Support #31 | Learn How to Use and Adapt Scrapbook Sketches | Day 1
- Allison
- Apr 24, 2023
- 3 min read

Once a month learn how to use scrapbook sketches and adapt them to fit different styles, photo sizes, and themes. Sketches = endless scrapbooking ideas with little effort. Sketches do all the heavy lifting allowing you to have all the fun!
It's Sketch Support time! That means another free sketch, four layouts, and a YouTube video! Yay!
This month there is a free two-page sketch. This sketch was actually inspired by an older sketch I had created many years ago. With sketches, sometimes it's the same as when we look at older layouts and wish we could do them over. So that's kind of what I did here. I updated a design that I knew could be so much better. And, I felt like the use of a large title would work well with a lot of larger cut files designs.
Here is the sketch that I have used as the starting point for each layout this week:

You can also grab the Sketch Support #31 Bonus Sketch Examples!
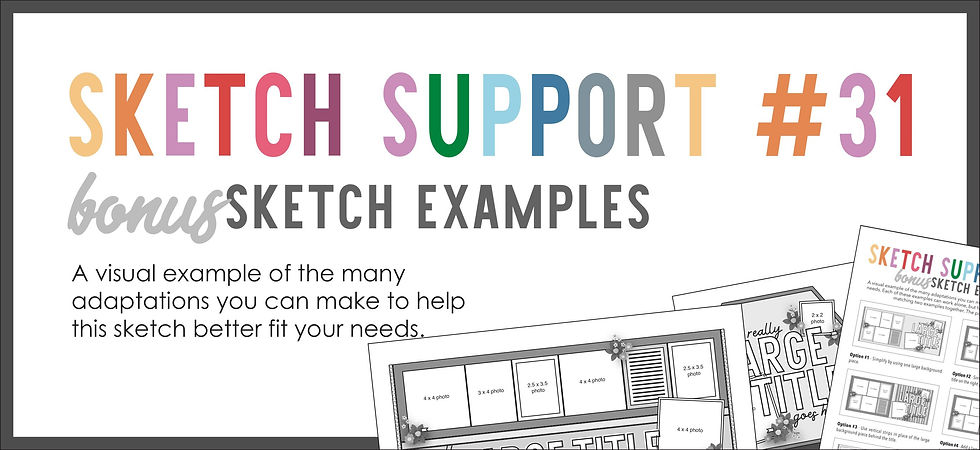
This month it is a 3-page PDF of 22 different sketch options. That makes 23 sketches for this month of Sketch Support. There are options that show how to change up the papers, use more photos, use less photos, there are four two-page options, and then an 8-1/2 x 11" option. The fun part is that you could use each option as a layout on its own, but you could also mix and match different options for endless possibilities!

Supplies used - Cardstock: American Crafts; Patterned paper: PhotoPlay, Simple Stories, and Bella Blvd.; You & Me cut file: Silhouette Design Store #240586; Heart punches: Recollections: Puffy hearts: Doodlebug Designs; Wooden phrase: Elle's Studio; Word/phrase stickers: Bella Blvd; Embroidery floss: DMC; Computer font: Century Gothic
Variation #1 - Changing the title and photo arrangement on the right page.
One of the things I like about this sketch is the large title and how you can easily adapt it to work with what ever design/layout you want to create or the cut file you want to use. I used a "you&me" cut file and adapted it to fit within the space of the white grid paper background.

I still used the same photo sizes as the sketch, but I moved the 2 x 2" photo down to the bottom with the with the 4 x 4" photo. I wanted to make sure enough of the "you&me" was showing so it felt like a better option to go ahead and adjust that.

The way I approached the sketch and the right side large title was to find a cut file I liked and then I arranged my photos to fit that. There's a lot of possibilities there to create unique arrangements and designs!
Variation #2 - Using more photos on the left page.
I am always drawn to creating sketch designs with large photo blocks on them. To me they are the easiest to adapt to the photo sizes you have or want to use. And, there are so many different photo size and amounts that you can combine to fill that space!

I wanted to include lots of photos of Drew and I together so I swapped out all of the photos with 2 x 2" photos. The photo block still has the same measurements as the photo block on the sketch, but I was able to include so many more by using these smaller photos.

Variation #3 - Using a larger journaling block.
I had quite a bit to say with this layout so I used a larger journaling block that fills in a 2 x 8" space on the edge of the photo block.
That's all for today! Be sure to come back tomorrow to see the second layout using this sketch!
If you enjoy using sketches and want to learn how to adapt and customize them, I have a new guide called Creating With Sketches. It's goes in depth of how I breakdown a sketch design and adapt to work with my needs. It covers everything you need to know about making sketches work for you.

Shop all sketches here: Allison Davis Sketches
Want to see more? Find me on...


Both industries link thrive on the consumer appetite for design, and appreciation of the work that goes into it. I hope me being here can shed at least some light on the way in which link fashion and watches – and their respective creative link communities – can co-exist and even inspire and elevate one another.
Technically, the link 5370P's rattrapante mechanism is actuated via a pusher in the three o'clock crown rather than on the opposite side of the case like link in Lange's approach. The Patek CHR 29-525 PS also incorporates a split-seconds link isolator that the Lange caliber L101.2 lacks. Many would consider Patek's approach to be the more orthodox of the two, which is natural and fits in with the brand's overarching Genevois approach.