
Sketch Support #31 | Learn How to Use and Adapt Scrapbook Sketches | Day 4
- Allison
- Apr 27, 2023
- 2 min read

Once a month learn how to use scrapbook sketches and adapt them to fit different styles, photo sizes, and themes. Sketches = endless scrapbooking ideas with little effort. Sketches do all the heavy lifting allowing you to have all the fun!
Here is the sketch that I have used as the starting point for each layout this week:

You can also grab the Sketch Support #31 Bonus Sketch Examples!
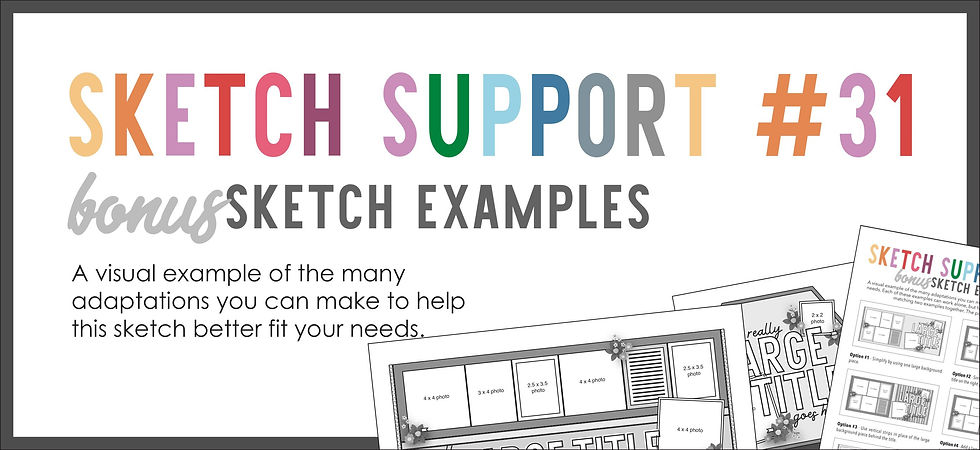
This month it is a 3-page PDF of 22 different sketch options. That makes 23 sketches for this month of Sketch Support. There are options that show how to change up the papers, use more photos, use less photos, there are four two-page options, and then an 8-1/2 x 11" option. The fun part is that you could use each option as a layout on its own, but you could also mix and match different options for endless possibilities!

Supplies used - Cardstock: American Crafts; Patterned paper: Simple Stories; "Oh Happy Day" cut file: Silhouette Design Store, Paige Evans #330139; Ink: Tim Holtz Distress Ink; Watercolor: Taylored Expressions; Wooden pieces: Color Cast Designs and unknown; Word/phrase stickers: Simple Stories; Alphabet stickers: Doodlebug Designs; Computer font: Century Gothic; Embroidery floss: DMC
I felt like converting this two-page sketch into a one-page layout was quite easy! I focused on that large title on the right page and let it become the whole focus of my layout.
I doubt anyone would argue that Paige Evans is the queen of large word/phrase cut files and I knew those would work so well with this sketch. That's actually what I thought of while making the sketch. I chose to use her "Oh Happy Day" cut file at my large title. I backed most of the letters with colorful patterned papers and then added three photos to three of the letters.

I still added the two photos on the sketch, but I used smaller ones for both of them and arranged them to fit better with this large title design.

Instead of using the paper background, I used a stencil and some ink to add a star background along with some watercolor misting.

With the stars attached to the words I added another, larger star layer behind them and then two stars on top. I thought that added a fun embellishment to the whole design.
That's all for today! Be sure to check back on Monday to see the YouTube version!
If you enjoy using sketches and want to learn how to adapt and customize them, I have a new guide called Creating With Sketches. It's goes in depth of how I breakdown a sketch design and adapt to work with my needs. It covers everything you need to know about making sketches work for you.

Shop all sketches here: Allison Davis Sketches
Want to see more? Find me on...


Meanwhile, AP calls the size of the Concept "generous" and I think that word might be generously kind in and of itself. But that's what the Concept is meant to be. Look at any other brand making hyper-sporty and futuristic watches and then consider the price here, 150,00 CHF. It's an insane link amount of money, but less insane than what anyone else is link asking, which makes it a bargain by comparison for what link is still an incredible watch.
Before we all despair, it's helpful to remember that watch placements aren't targeted at hardcore enthusiasts. The placements link are designed for (and are highly link effective) generating brand awareness on a mass consumerist scale. And listen, if I were offered a gigantic check I might also be link inclined to wear something I had little interest in.
Hi!
I love this layout! How did you do the stitching- with embroidery floss no less?
Thanks, Jo