
Sketch Support #9 | Learn How to Use and Adapt Scrapbook Sketches | Day 5
- Allison
- May 29, 2020
- 2 min read

The last day is always about changing the size of the layout. I always like to show that you can use a two-page sketch to create a one-page layout or a one-page sketch to create a two-page layout. It's actually really easy to do to!
Here's the new, free two-page sketch that I have used as the starting point for each layout this week.

You can download the full sketch with measurements and placements by clicking here.


Supplies Used - Cardstock: American Crafts; Patterned paper: Echo Park Paper Co.; Wooden word: Heidi Swapp; Star stickers: Simple Stories; Circle punch: Fiskars; Alphabet stickers: Simple Stories; Embroidery floss: DMC; Computer font: Century Gothic
To convert the two-page sketch into a one-page layout, I mostly focused on the main design elements: the photos arranged in a straight line and the vertical background strips.
Variation #1 - Using smaller photos.
Typically one of the best ways to replicate a two-page sketch on a one-page layout is to shrink the photos. I used three 2-1/2 x 3-1/2" photos in place of the 3 x 5" photos. They are still vertical photo and they are still arranged in the same line across the layout, they are just slightly smaller.
Variation #2 - Removing elements.
I only had three photos I wanted to use for this layout so I eliminated the 6 x 5" rectangle piece and instead place my title above the photos and my journaling below the photos.

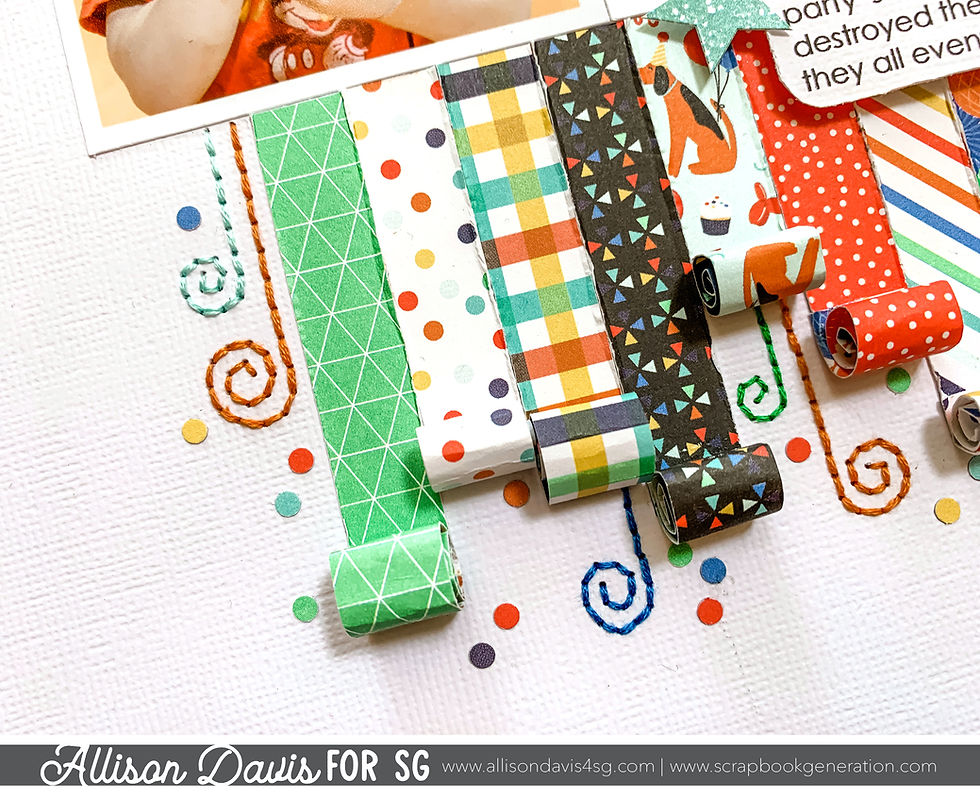
Variation #3 - Changing the sizes of the vertical strips.
If you ever want to include more patterns or colors, a good option is to use a smaller width of strips. I used 1/2" strips instead of the 2" strips on the sketch. If I had used the 2" size, I wouldn't have been able to fit very many on my page and I wanted to work in lots of different colors into this layout.
Variation #4 - Adding extra design elements.
This is where I had a lot of fun with this layout! I always enjoy find a way to incorporate the theme of my layout into the design.
At first I thought this design would be great for making birthday candle strips with a little flame at the top of each strip to match the birthday theme. Then it popped in my head that maybe I could mimic the party horn at the bottom of my strips to go along with the photos.

So I rolled up a coordinating piece of paper and adhered it to the end of each strip. I didn't just roll the end of the strips because I wanted the pattern on the rolled section to be the same as the strip.
To finish the design I added some hand-stitched swirls and confetti.
That brings us to the end of this portion of Sketch Support, but check back on Monday for the video version. The great thing about the video version is that it's a little easier to explain some of the changes and techniques and I usually through in some mini-tutorials so you can get a visual of how I did certain things.
Want to see more? Find me on...


Technically, this is a new movement, the A. Lange & Söhne caliber L951.8. You can trace the linage back to the L951.1 found in link the original Datographs. The current generation, including the recent white gold/blue dial release, all have an updated L951.6 caliber that shows link that power reserve indicator at six o'clock. More than just shedding the display, the new L951.8 features added link attention to finishing that is immediately apparent and incredibly striking.
Comparing the design link to the Cornes de Vache, Selmoni said that "the design of link the 6026 is more classic; the case is just fabulous. If you can look at the lugs, the finishing is amazing. The mid-case is satin finished, which contrasts with the polished elements. It's link an amazing timepiece."
This is one of the most fun layouts I have seen in a long time. I love how the paper is rolled at the bottom, I love the confetti dots, I love the bright colors. Fun, fun, fun.